Installation Requirements
-
Environment
Your Cascada needs to be installed on a flat, sturdy surface free of extraneous material that could cause the bucket to hang in a tilted position.
-
Power
Your Cascada comes with a low-voltage 32W power supply that screws in at a junction box to convert high-voltage line power to low-voltage power.
-
Water
Incoming water lines can come up through the ground or down from the rafters and be plumbed into your device through the right or left, on the inside of the wall or behind the wall.
-
Wifi (Optional)
To use the hydration tracking app you will need strong, reliable wifi within range of your Cascadas. No wifi? Don't worry, your Cascada works great as an automatic waterer itself!
Get to Know Your Cascada
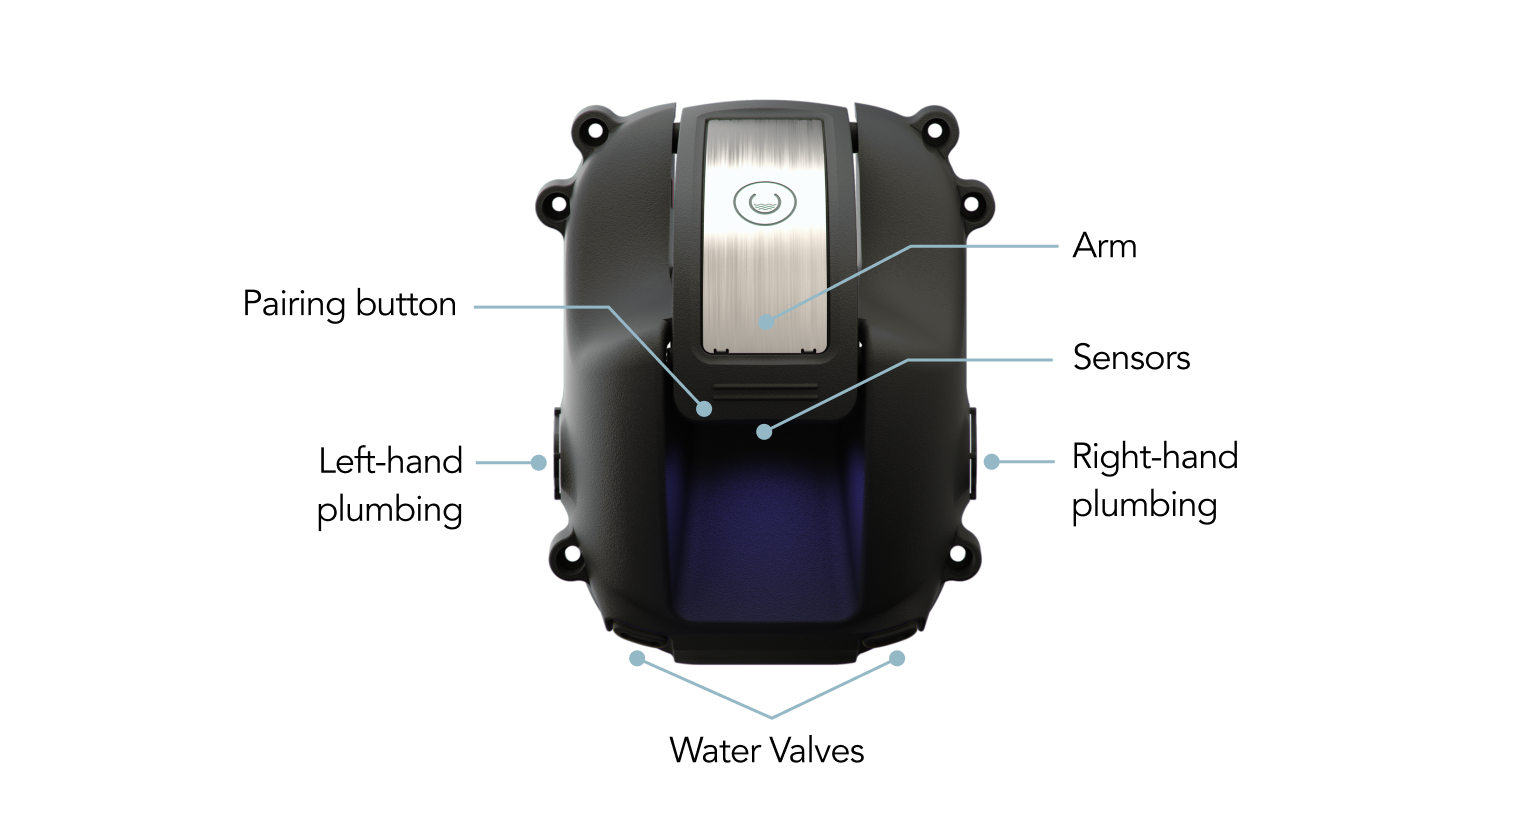
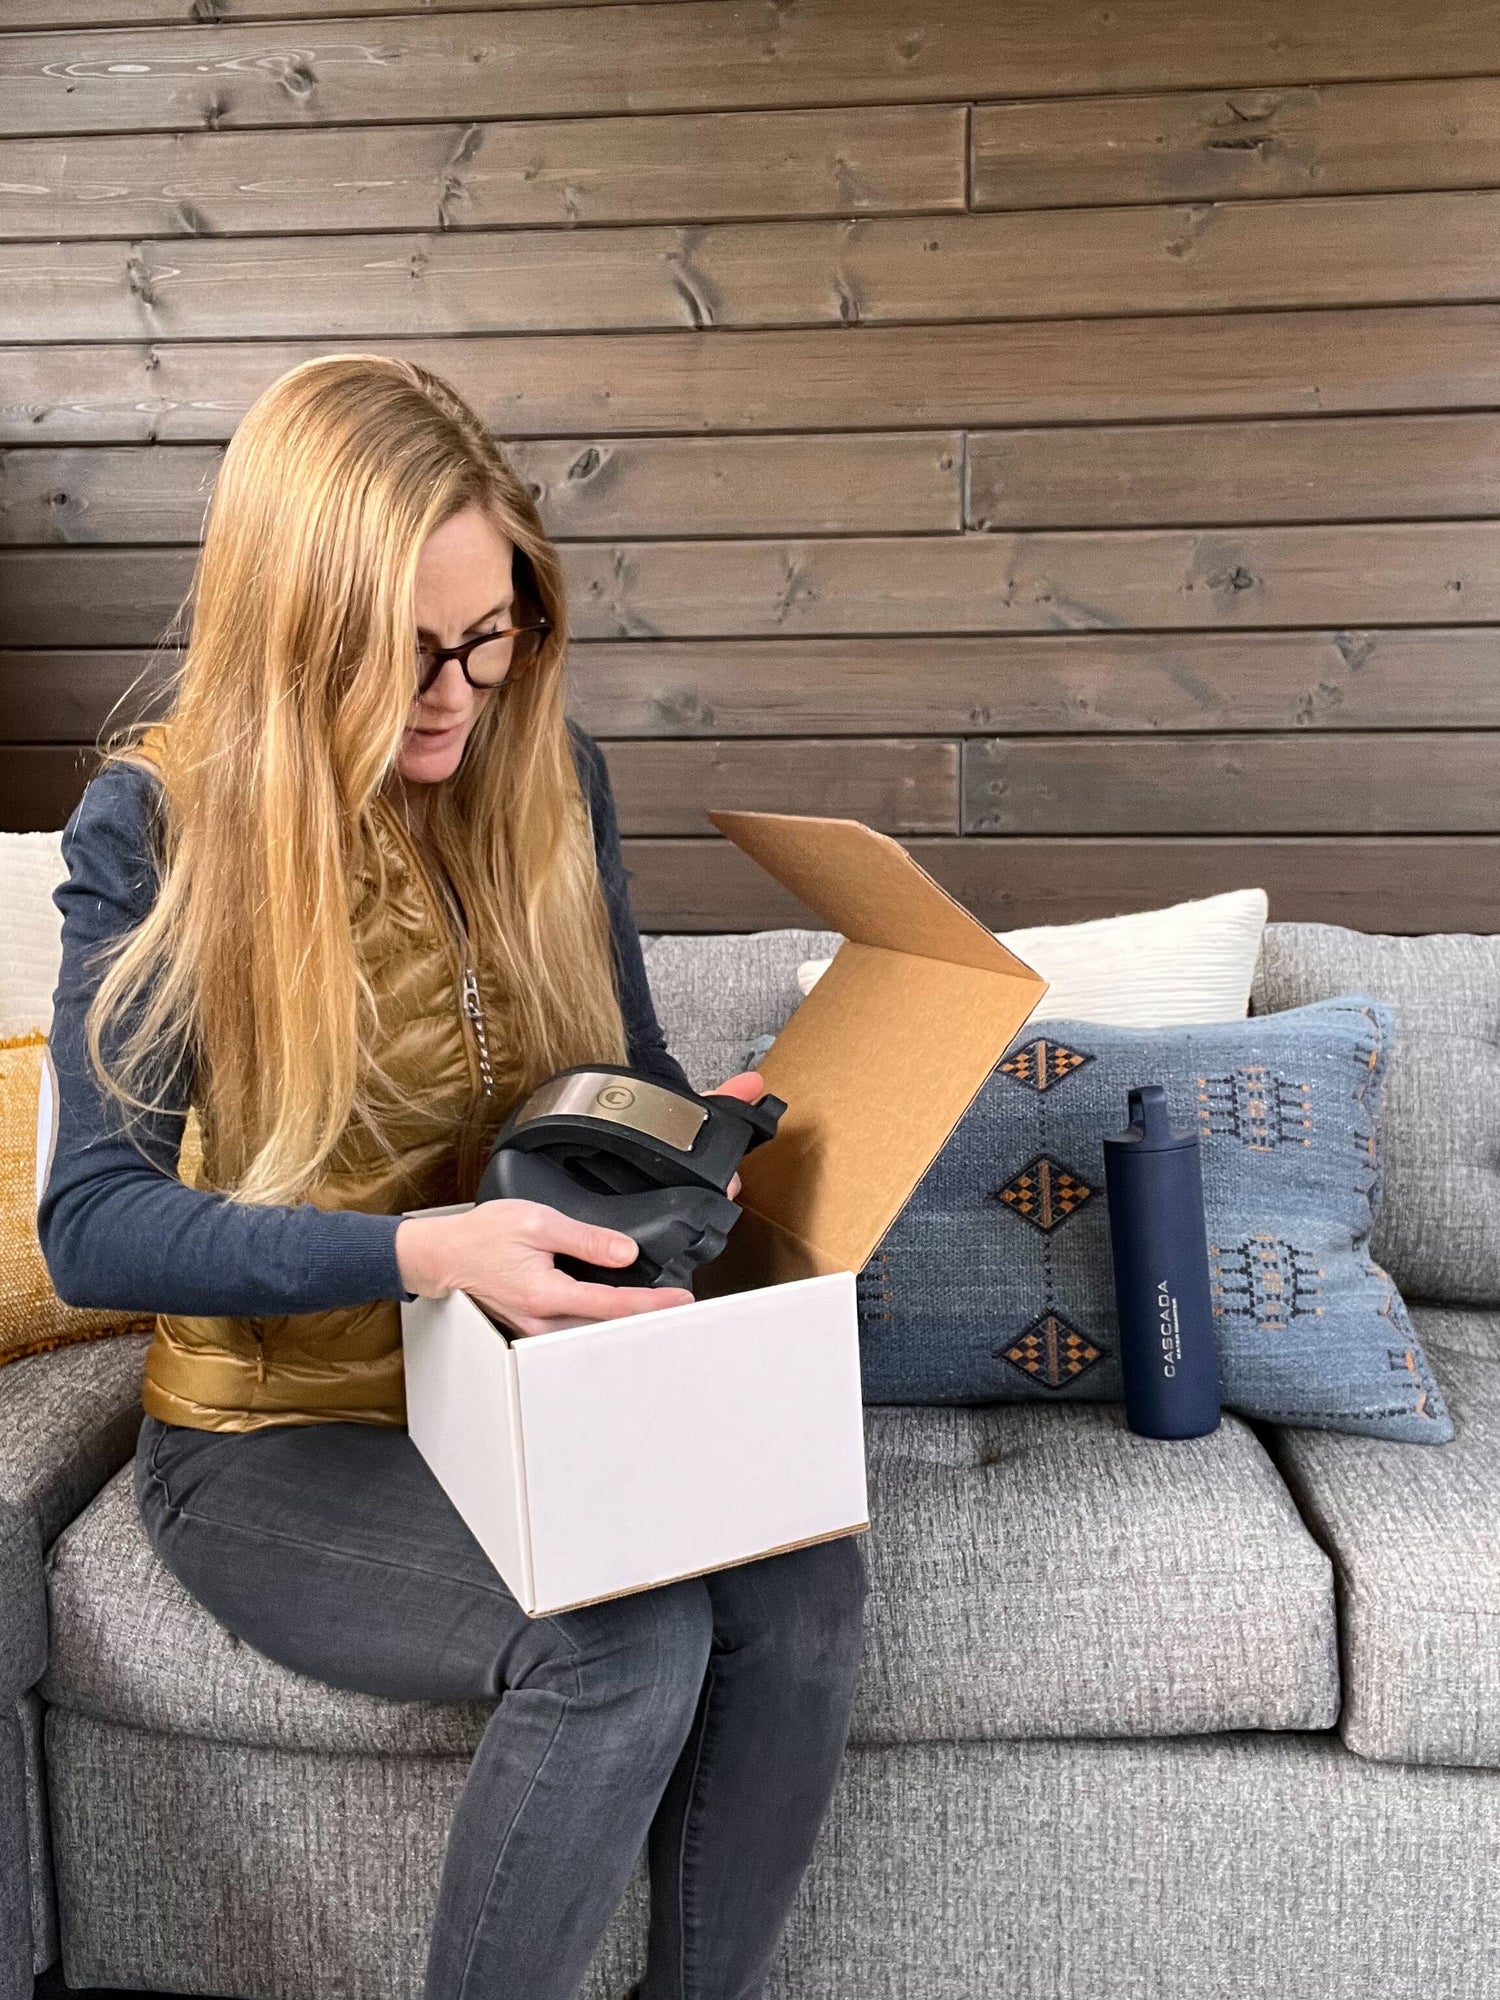
Unbox Your Cascada
Once your plumbing and electrical lines are in place, you can start installing your Cascadas! Cascadas ship in a conveniently sized 9X12 inch box with everything you need to install your new state-of-the-art automatic waterers.
The device is 9”X6.5”, protrudes off the wall 5", and only weighs 4 lbs.
Included With Your Order


Installation Prep
Select Cascada Placement
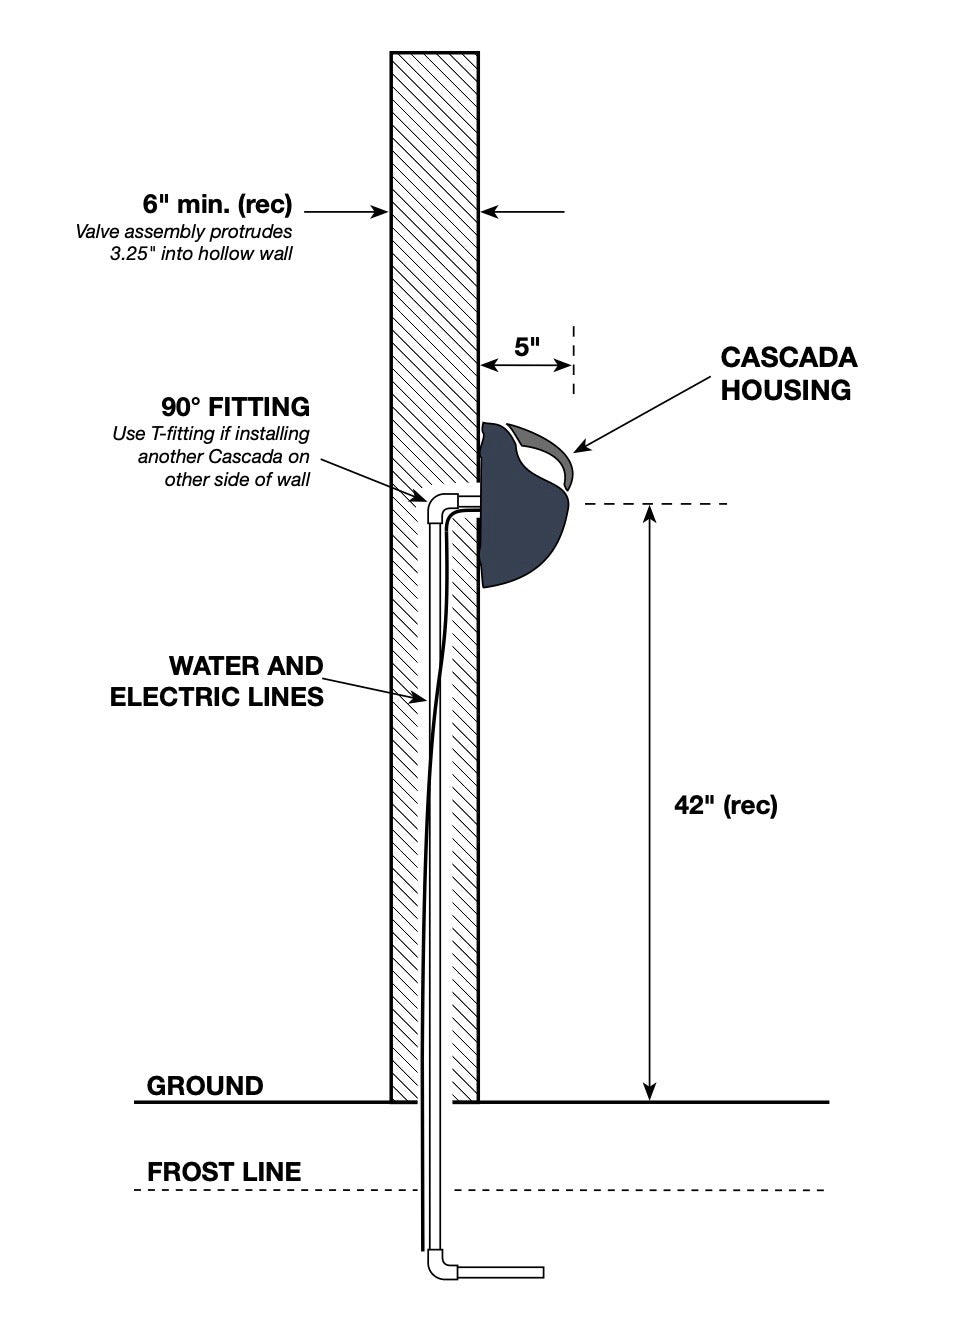
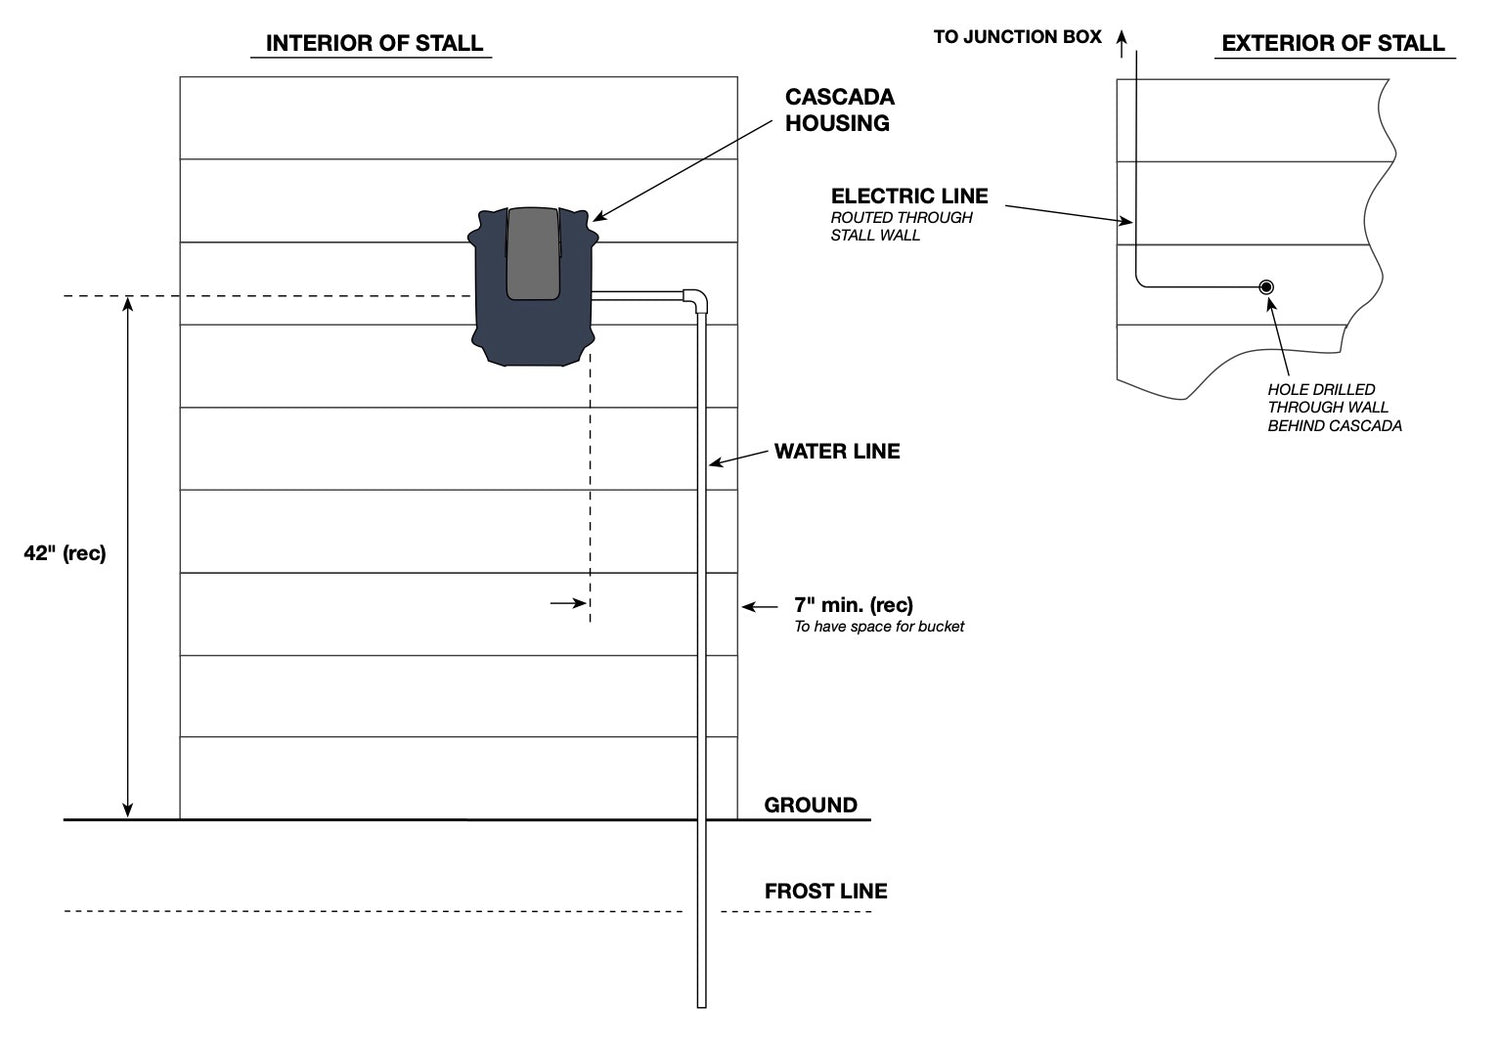
Cascadas can be installed with plumbing to either the left or right of the device and with the water/electrical lines on the inside of the stall wall or behind the stall wall (i.e hollow wall or corner installation).
Check out our article on Cascada placement ideas!
Regardless of the placement, keep in mind the wall must be sturdy, flat and free of extraneous material that could cause the bucket to hang in a tilted position.
- Recommended Height: 42”
- Wall Material: Wood (1.5” thick min), concrete (alternate fasteners required, not provided), sheet metal or poly board with wood core (1.5” thick min)
- Wall Flatness: The wall must be true to vertical +/-1 degrees and free from significant gaps and obstructions (note: if the wall is out of the above range, performance may be reduced)
- Load Bearing Requirement: 50lbs
Install Water Lines + Y Filter
Incoming water lines can come up through the ground or down from the rafters and be plumbed into your device through the right or left, on the inside of the wall or behind the wall.
Your lines can must be protected from freezing temperatures with a method consistent with your area's requirements and installation environment.
Water requirements:
- Optimal water pressure is between 30-60 PSI.
- Cascada Water Inlet Fitting: ½” MPT
- Water must be clean and free of sand, rust, or other particles. Cascadas have a filter screen at the inlet side of the solenoid to prevent system damage. Excessive particles in the water supply will collect at the filter screen, which may reduce the flow/fill rate of the product requiring the screen to be cleaned or replaced. Water supplies with high contamination levels should install an external filter to prevent excessive maintenance for Cascada device screens.
We recommend having a shutoff valve at each Cascada for emergencies and easier winterization.
The Y-Filter ensures your Cascada valve remains debris-free. Screw the Y-Filter in at the brass mpt fitting or in a location in-line near the waterer. The flow must follow the direction of the arrow on the filter. The cap unscrews for cleaning if debris needs to be removed from the filter.
Install Electrical Wiring
- Required Input to Included Power Supply: 90-240 Volts, AC
- Power Requirement, Per Device: 32W, peak
- Breaker Configurations: 15 Amp Breaker (50 devices max) or 20 Amp Breaker (66 devices max)
- Power Supply PN: IRM-30-24ST
- Low Voltage Cable Length: 10ft cable length included (can be extended to 100ft max using 14AWG wire)
Planning to use a heated bucket?
Cascada devices have internal freeze-protection down to zero degrees Fahrenheit! This may mean you want to use a heated bucket to protect the standing water.
The optional heated bucket receives power from standard 120 Volts wall power. There are no electrical connections between the Cascada device and the heated bucket. A NEMA 15-5 receptacle must be installed away from animals and protected from liquid ingress and dust/hay buildup.
- Input: 120 Volts, AC. Not compatible with 240Volts
- Power Requirement, Per Bucket: 115 Watts
- Breaker Configurations: 15 Amp Breaker (Maximum of 12 buckets may be connected) or 20 Amp Breaker: (Maximum of 18 buckets may be connected)
- Plug: NEMA 15-5P standard grounded 3-prong plug
Install Sufficient Wifi (Optional)
To use the hydration tracking app you will need strong, reliable wifi within range of your Cascadas. No wifi? Don't worry, your Cascada works great as an automatic waterer itself!
To connect and start tracking hydration, your Cascada device requires:
- A reliable 2.4GHz 802.11b/g Wifi network with internet access to provide a connection to the phone app.
- Wifi access point within 60 feet of the Cascada and in line of sight. The higher on the wall/ceiling the better your connection will be.
- Signal requirement is -70 DBI or higher.
Get Your Tools
To complete your Cascada installation you will need the following tools:
- Cordless drill
- 1/8" drill bit
- Level
- #3 square drive bit
Hollow Wall Installation
Hollow walls are a great way to optimize plumbing lines and keep all plumbing and electrical lines tucked away.
- Hollow wall installation allows for water and electrical hookups to stay neatly tucked behind the wall. No lines in sight for curious horses to play with.
- Optimize water lines by installing the Cascadas opposite each other.
- Easily and effectively insulate water lines within the hollow wall.
- Great option for maximizing space in stalls.
- Electrical cable can follow water lines or run upwards toward the ceiling.

Corner Installation
Building a corner wall in your stalls is a great way to mimic a hollow wall, without the need for extra space between stalls.
- Corner wall installation also allows for water and electrical hookups to stay neatly tucked behind the wall. No lines in sight for curious horses to play with.
- Optimize water lines by installing the Cascadas opposite each other.
- Easily and effectively insulate water lines within the corner space.
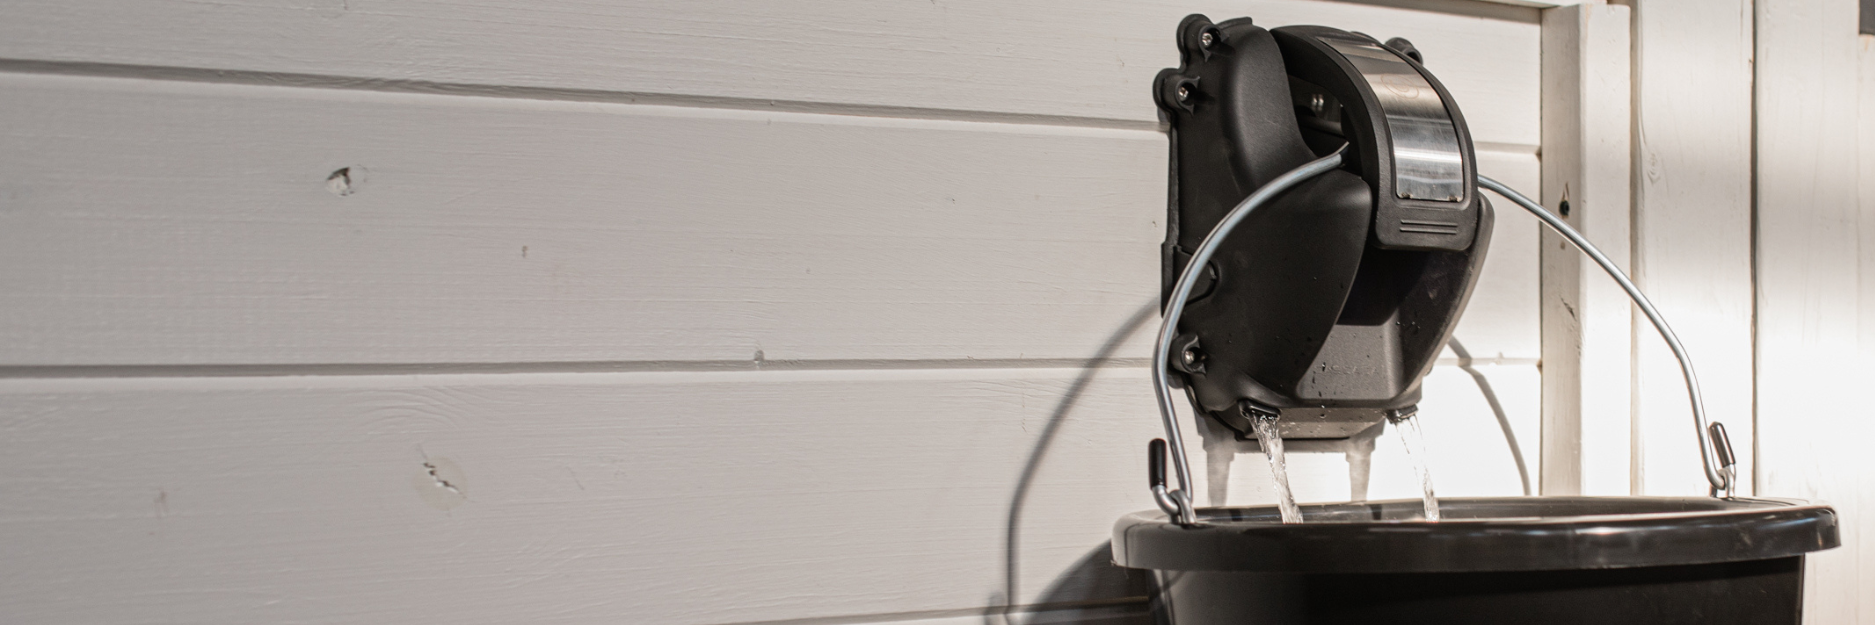
Surface Plumbing
Cascada has pop-outs on either side to run water and/or electrical lines from the right or left of the device.
- Water lines can run up from the ground (recommended for best freeze-protection) or down from the rafters.
- Electrical lines can either run with the water lines or come in from behind the unit through the wall (as shown in diagram).
- Water shutoff valves can be easily installed for each Cascada.
Installation Video

Installation Instructions

Step 1: Place Gasket on the Wall
Decide where you want to install your Cascada automatic waterer. Peel off the adhesive cover and stick gasket to the wall where you want to install your Cascada. Once placed, pre-drill holes.
Considerations for placement:
- If installing plumbing from behind the Cascada, you will need to cut a hole through your wall and gasket.
- The wall must be sturdy, flat and free of extraneous material that could cause the bucket to hang in a tilted position.
- Recommended Height: 42”
- Wall Material: Wood (1.5” thick min), concrete (alternate fasteners required, not provided), sheet metal or poly board with wood core (1.5” thick min)
- Wall Flatness: The wall must be true to vertical +/-1 degrees and free from significant gaps and obstructions (note: if the wall is out of the above range, performance may be reduced)
- Load Bearing Requirement: 50lbs
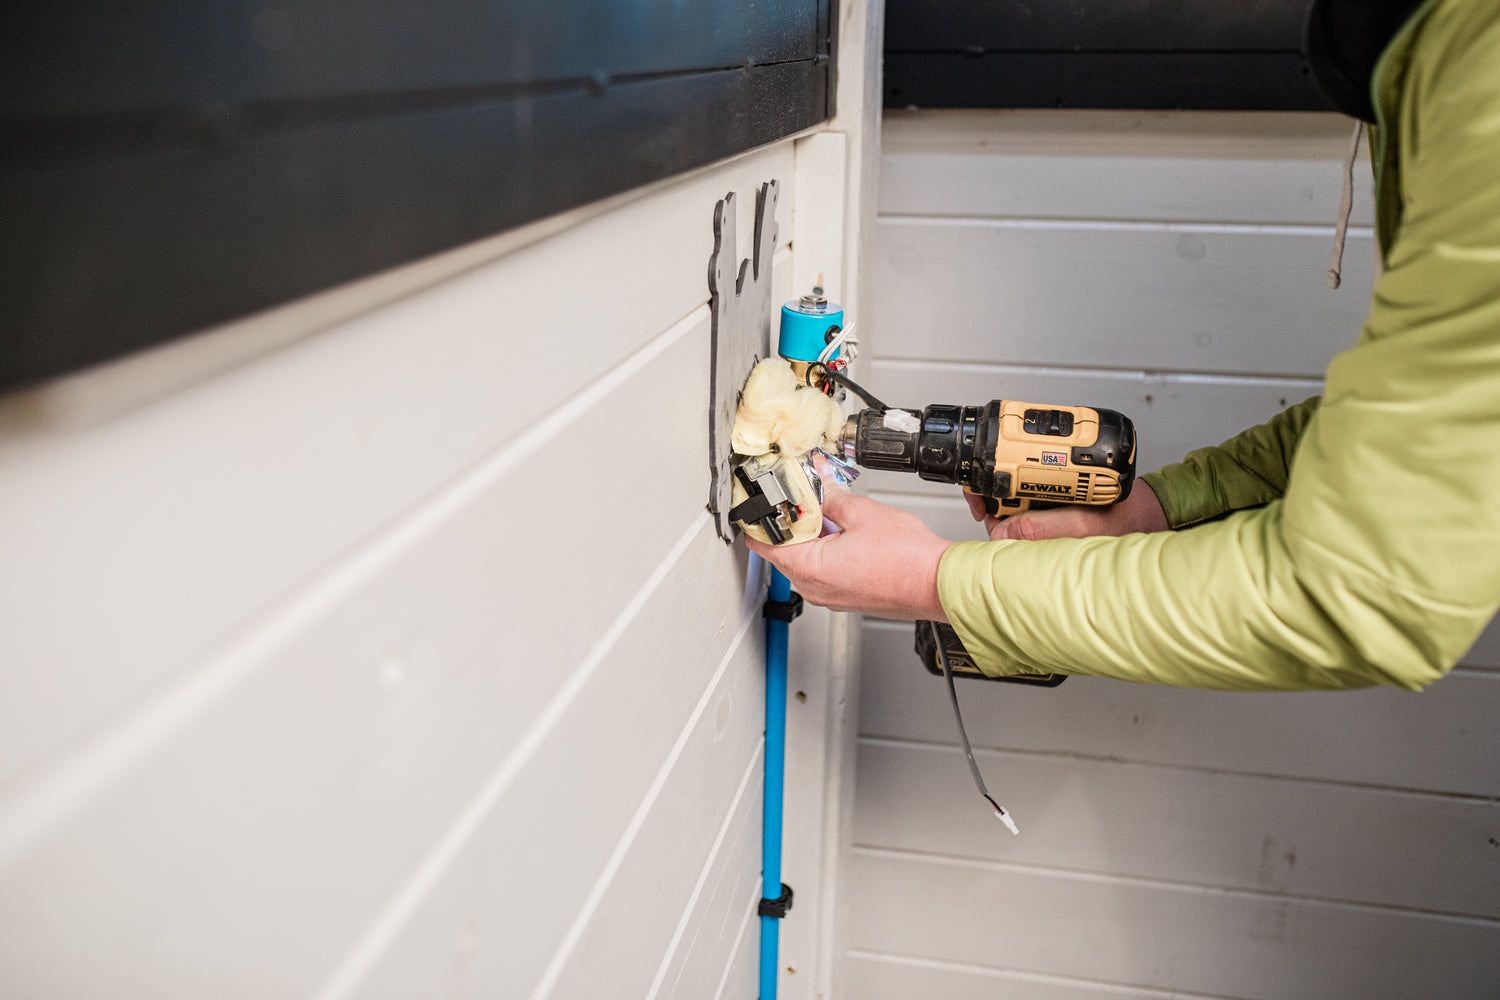
Step 2: Attach Fitting and Insulation and Connect to Water Line
Use plumbers tape to ensure a good seal around the ½ inch MPT fitting and any other plumbing connectors. IMPORTANT: DO NOT USE A PIPE SEALANT COMPOUND AKA PIPE DOPE. NOT COMPATIBLE WITH CASCADA VALVE ASSEMBLY AND CAN RESULT IN MALFUNCTION.
In colder climates, we recommend adding the extra insulation included with your Cascada order for extra freeze protection.
Simply wrap the insulation around the valve assembly and keep in place with the included zip ties.
Once the ½ inch MPT fitting has been taped and screwed to the valve and the insulation kit is wrapped around the valve, you can screw the valve to the wall/gasket and connect your water line.
IMPORTANT: Before connecting the water line to your Cascada valve, run the water for several minutes to flush out any debris from the pipes. Construction debris or sediment in your lines can impact your valve.
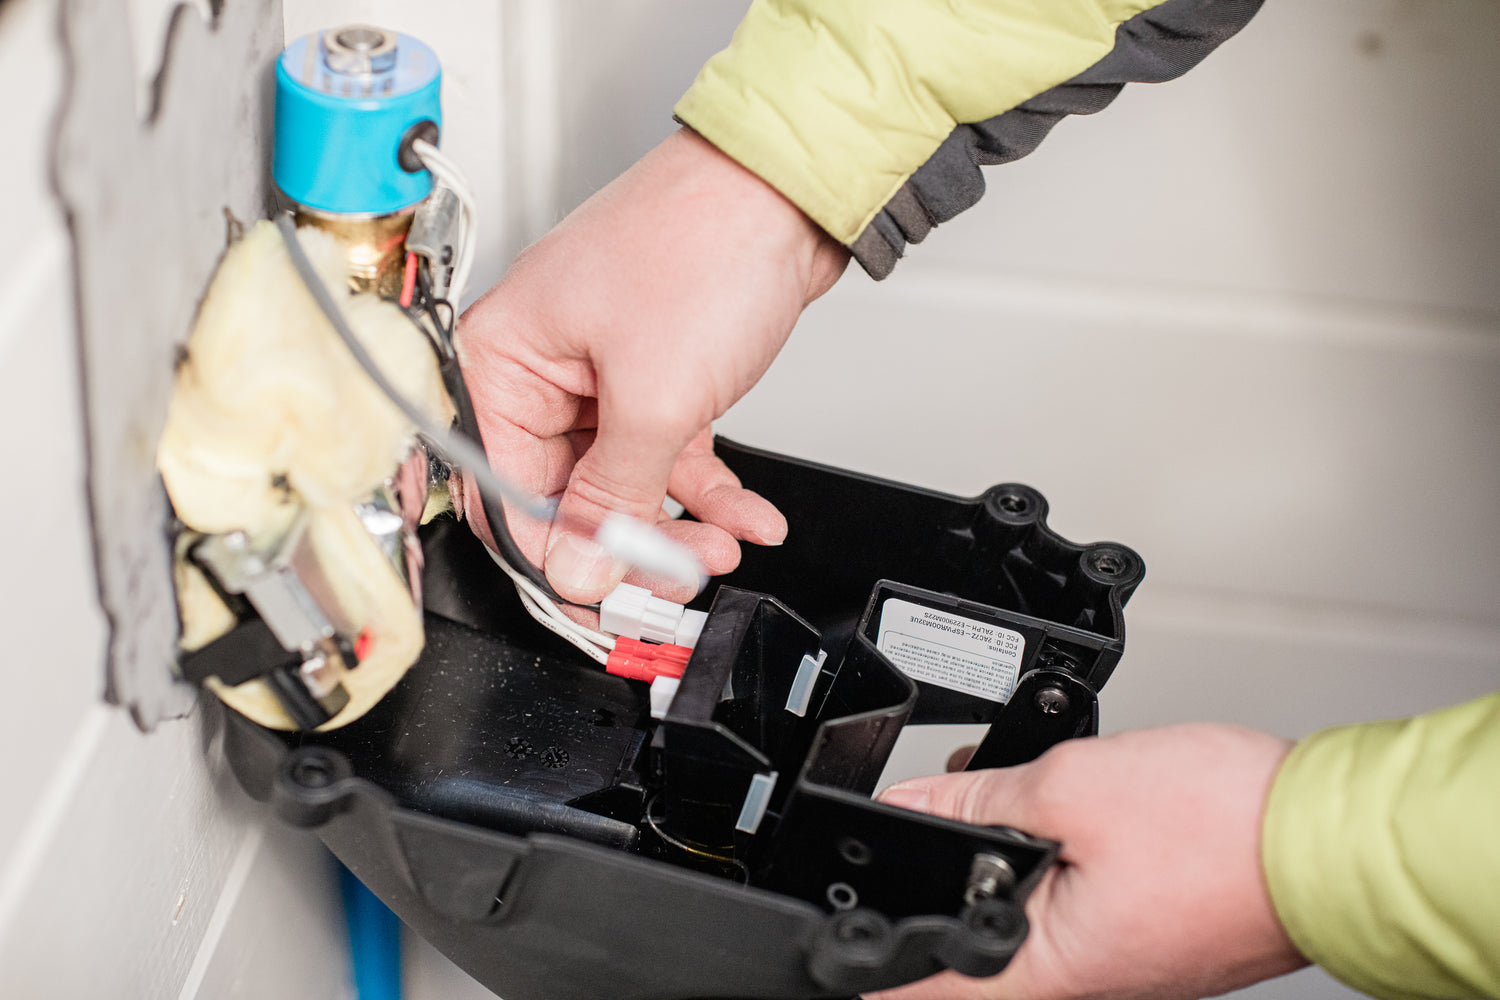
Step 3: Connect Electrical
Each Cascada device comes with a separate power supply that must be installed externally to convert high-voltage line power to low-voltage power used by the Cascada. A certified electrician must perform high-voltage electrical wiring.
Power Hookup Instructions:
- The included low-voltage power supply should be installed in a dual-gang junction box so it is protected from the elements and the high-voltage connections can be made in a safe and protected enclosure. Up to (2x) power supplies can be installed in the same junction box - but make sure to verify the fit of the power supply before installation of the wiring.
- Apply included dielectric grease to all connectors.
- Attach the connectors on the low voltage wire to the Cascada to provide power, and the other end of the cable must be attached to the low-voltage output screw terminals of the power supply.
Caution: Improper wiring not in compliance with NEC and Cascada installation guidelines may cause hazardous conditions in your facility. The Cascada is a low-voltage device, do not make high-voltage electrical connections within the product enclosure.
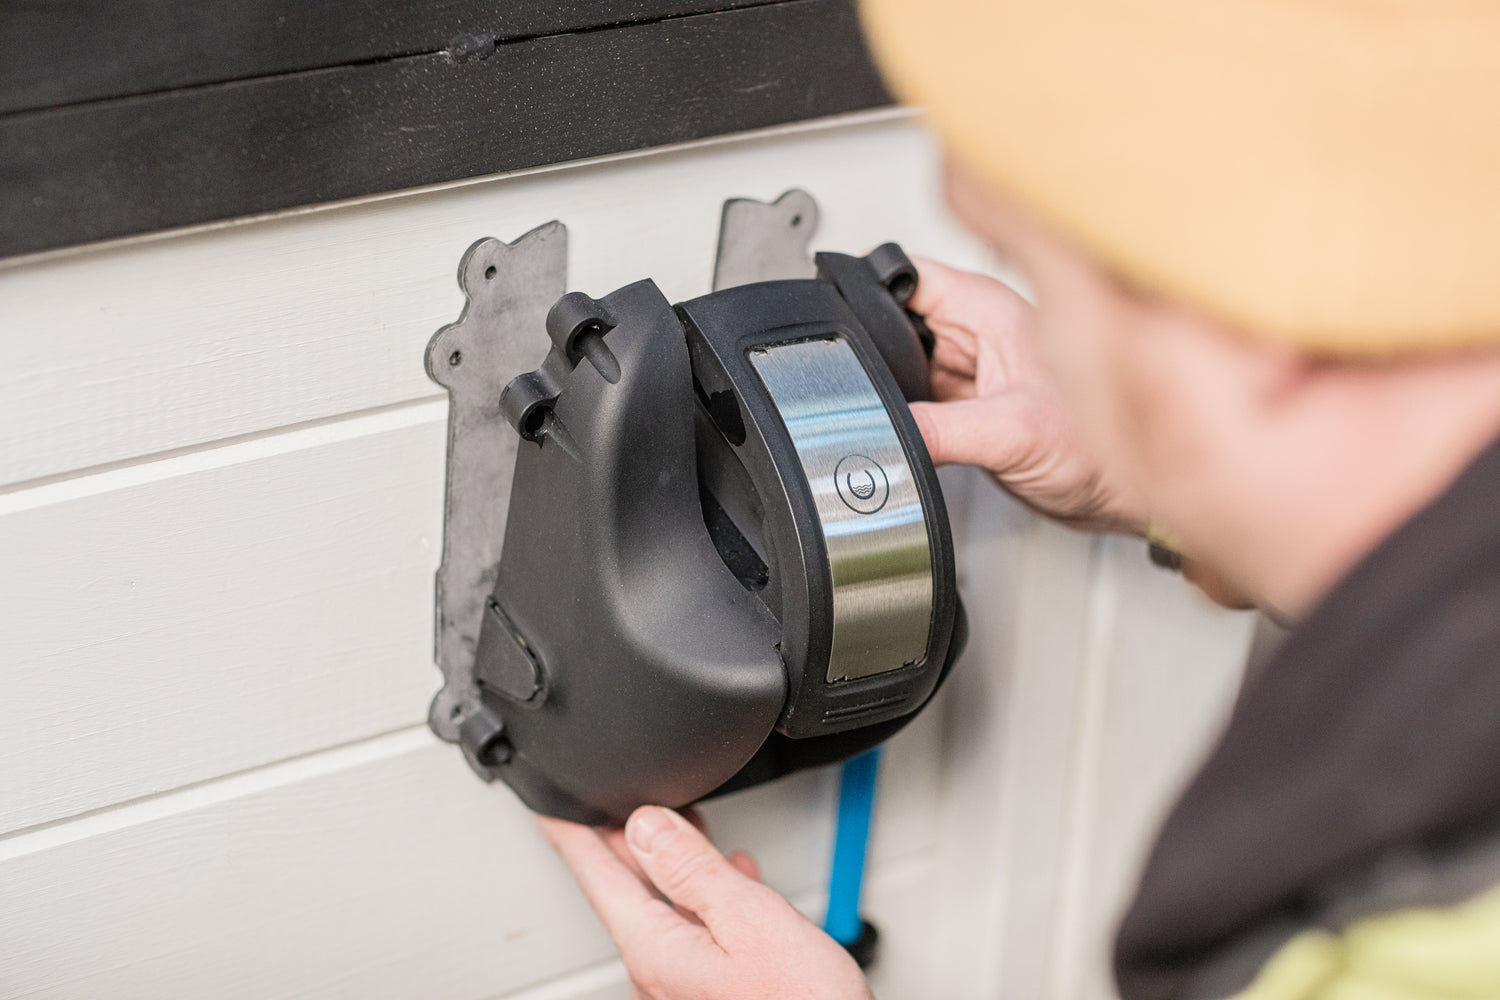
Step 4: Screw Enclosure to the Wall and Power On
Turn the circuit breaker ON. The light on the Cascada should turn on and shine down from below the handle. It can be difficult to see if it’s not dark.
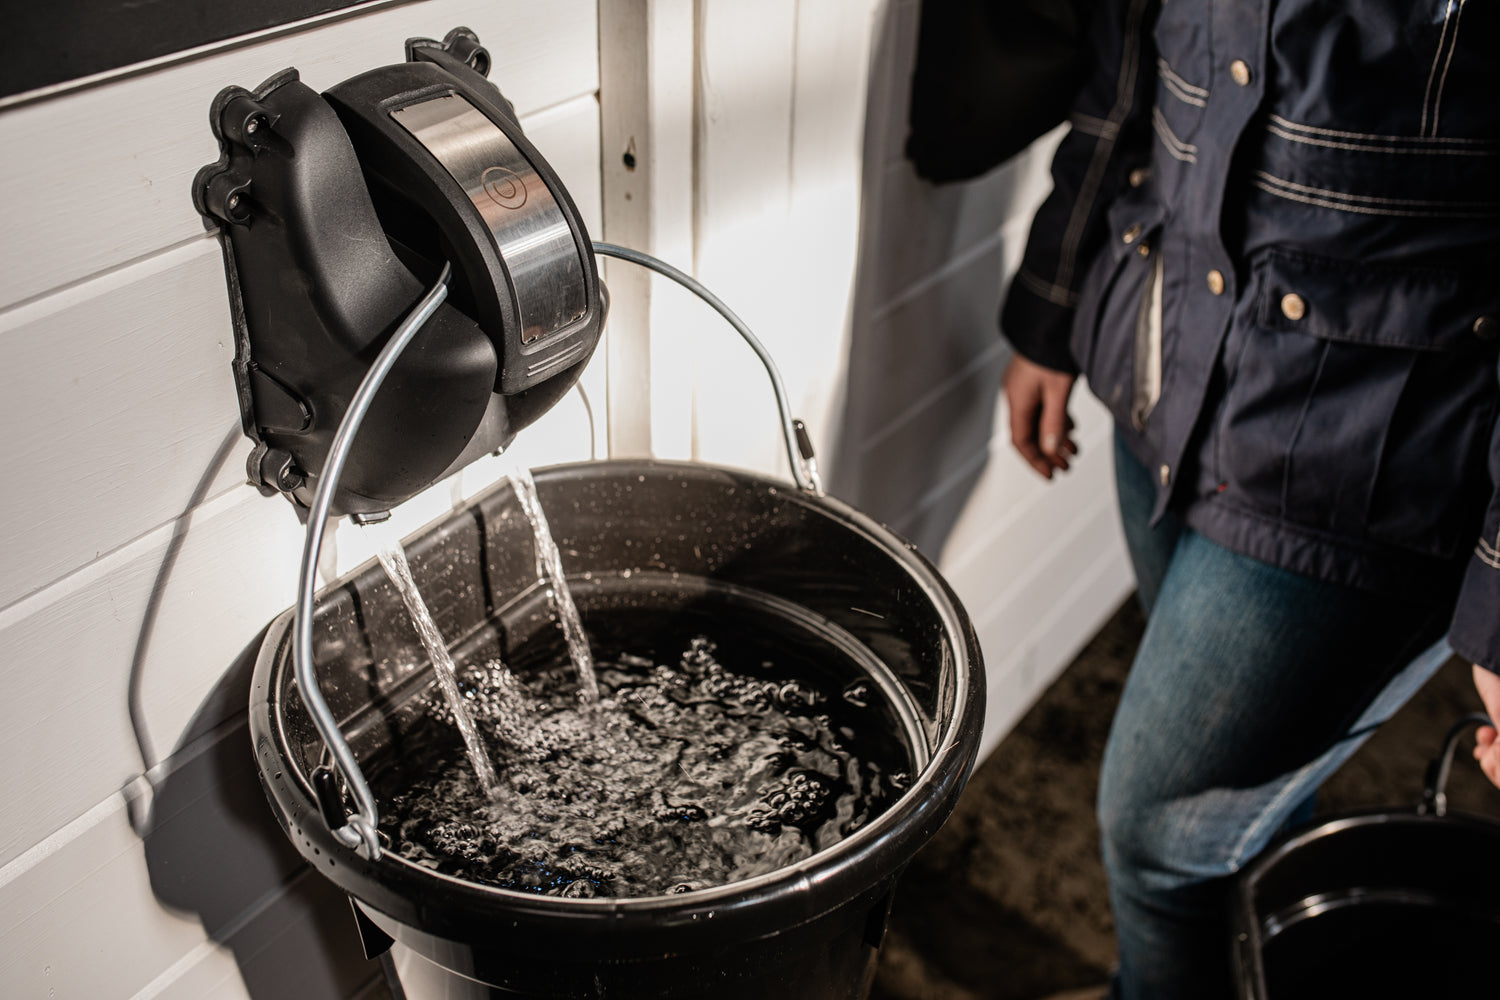
Hang a bucket on the unit and verify that it fills. It should begin filling within 60 seconds of hanging the bucket. Once a bucket is present, the light should start flashing white and then begin filling.
IMPORTANT: Flush water lines sufficiently. Let the Cascada fill, dump and refill 6-7 times to ensure the water lines are sufficiently cleared.
Start Using Your Cascada Waterers!
That's it! Once you turn on the Cascada's power and flush the lines they are ready to water your horses.
Check out our detailed onboarding guide to better get to know your new waterer and setup the hydration tracking app!
Additional Information
Light States
- Light Blue, Solid: Normal, bucket detected
- White, Pulsing: Bucket detected, waiting to fill
- White, Solid: Bucket filling, valve is open
- Yellow, Pulsing: Bucket missing, not filling
- Yellow, Solid: Horse detected
- Dark Blue, Pulsing: Looking for phone
- Dark Blue, Solid: Paired with phone
- Green, Solid: Connecting to wifi and server
- Blue/Yellow/White, Sequencing: Connection to the phone is ending OR reconnecting to power
- Red, Solid: Button pressed too long or taking too long to fill
Button Functions
If the Cascada has previously been set up with a Wifi network and you need to connect to a different network, press the button for 11 seconds to clear out previous credentials before proceeding.
Pressing the button for 3sec will put the Cascada into pairing mode.